what? Flash meter? Where is holy?
Release Time:
2022-09-09 09:03
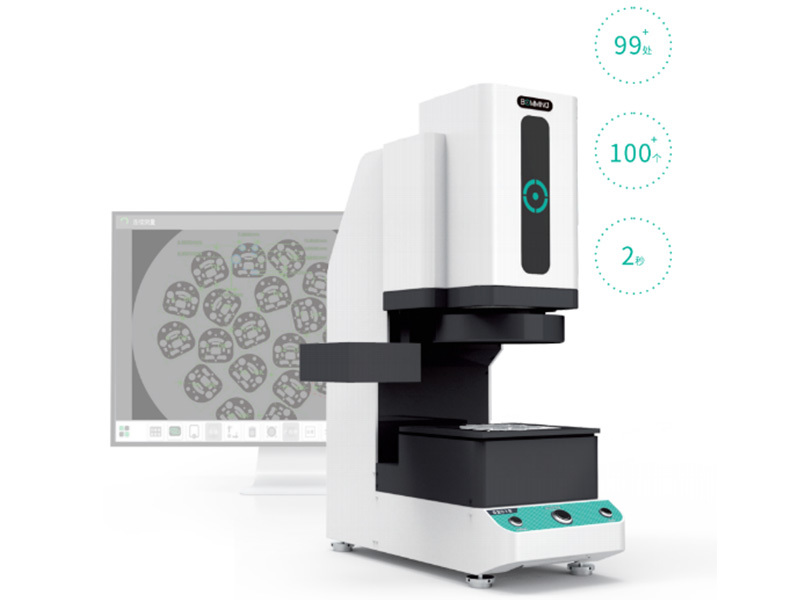
Flash tester, many people may be hearing this name for the first time. She has many names, including intelligent automatic flash tester, flash test imager, one-button image tester, quick tester, etc. Flash tester should be regarded as a nickname. "Flash" means fast, just like lightning, it is conceivable that it is a fast measuring instrument, mainly used for two-dimensional measurement, and can be widely used in mobile phones, automobiles, precision parts, machinery, electronics, molds, connections It can be said that "where there is measurement, there is a demand for flash testers". It is especially suitable for batch measurement of small-sized workpieces such as mobile phone accessories, gears, springs, screws, etc.
In the process of using the flash tester for precise measurement, the user only needs to press a button, and the instrument can quickly perform accurate measurement according to the appearance and shape of the workpiece. All geometric values of the workpiece can be completed in a few seconds, including length, width, hole spacing, spacing, arc, diameter, radius, groove, angle, R angle, geometric tolerance and other data, and statistical analysis reports can be automatically exported with one click. With its simple operation, fast measurement and powerful intelligent design, the flash tester makes up for the blank of the precision measurement industry in the extremely fast measurement technology.
Such a magical device can't just fall from the sky, can it? Of course not, she was also conceived in the long river of time. And listen to me in detail.
In the late 1970s, especially since Professor David Marr established the theoretical framework of "Computational Vision", image processing technology and image sensors have developed rapidly. With the development and maturity of coordinate measurement technology, in the field of optical measurement based on optical comparison, the development and application of coordinate measurement methods have made further substantial progress.
In 1977, View Engineering Company of the United States invented the world's first RB-1 image measurement system with XYZ axes driven by motors. In addition, the BoiceVista system of Mechanical Technology has fully learned the advantages of the coordinate measuring machine and integrated a video picture measurement system on the probe of the coordinate measuring machine, which can compare the measurement data with the pre-programmed nominal dimensions and tolerances Compare.
The two instruments draw on the coordinate measuring principle of the coordinate measuring machine through different ways, and project the image of the object to be measured into the coordinate system. Its measuring platform inherits the form of coordinate measuring machine, but its measuring head is similar to that of optical projector. The appearance of these instruments has opened up an important measuring instrument industry, that is, the image measuring instrument industry. In the early 1980s, there was an important development in image measurement technology. In 1981, ROI Company developed an optical imaging probe (see Figure 2), which can replace the contact probe on the coordinate measuring machine for non-contact measurement. Since then, this optical accessory has become one of the basic components of imaging equipment. In the mid-1980s, image measuring instruments with high-magnification microscope eyepieces appeared on the market.
In the 1990s, with the development of CCD technology, computer technology, digital image processing technology, LED lighting technology, and DC/AC servo drive technology, image measuring instrument products have achieved tremendous development. More manufacturers have entered the market of image measuring instrument products, and jointly promoted the development of image measuring instrument products. After 2000, my country's technical level in this field has been continuously improved, and the literature on the research of image measurement technology has also appeared continuously; the image measurement instruments developed by domestic enterprises have also been continuously improved and developed in terms of production scale, variety and quality. In 2009, my country formulated the national standard GB/T24762-2009: Acceptance testing and re-inspection testing of product geometric technical specifications (GPS) image measuring instruments. An image measuring instrument with positioning or measuring functions in the Z direction of the coordinate system.
Traditional imagers need to go through a complex process when measuring workpieces, which brings obstacles to batch inspection, and the measurement software may cause errors due to manual or other reasons when performing operations such as edge finding, reducing the measurement efficiency. The flash tester is designed for this problem. When the user is using it, the workpiece is placed on the platform smoothly, just press the start button, and the instrument will automatically measure the geometric quantity according to the appearance and shape of the workpiece, which greatly simplifies batch inspection process.
Next, let's learn about this artifact and the manufacturers that can produce high-quality products.
Zhuhai Boming Vision Technology Co., Ltd. is committed to the development and application of optical vision technology. The core technology and management team members have more than 15 years of experience in the development and application of machine vision industrial inspection, graphic image acquisition and processing, pattern recognition and automation. The self-developed Smart series flash testers are widely welcomed by customers in the industry and have been well received. The S series flash tester adopts dual-field low-distortion optical lens, combined with high-precision image analysis algorithm, with a variety of light sources, surface light, low-angle light, telecentric parallel light, coaxial light, etc. In continuous measurement mode, just press Press the start button to realize one-key measurement, display the measurement results in 2 seconds, and automatically generate statistical analysis reports.
The S series flash tester has several characteristics of high efficiency, precision, simplicity and fast output.
Latest News
2022-09-09
3D visual inspection, the era of 3D measurement is coming
With the development and progress of machine vision, 3D machine vision has ushered in a huge opportunity in the automation industry. According to Grand View Research, by 2027, the global 3D machine vision market is expected to reach US$3.46 billion, with a compound annual growth rate of about 14.7%. Quality assurance and inspection applications are expected to occupy the top spot in the 3D machine vision market by 2022.
View Details 》2022-09-09
Guangdong 3D profile measuring instrument is based on CCD digital image
Guangdong 3D profile measuring instrument is based on CCD digital image, and is produced by relying on computer screen measurement technology and powerful software ability of spatial geometric calculation. After the computer is installed with a special control and graphic measurement software, it becomes a measurement brain with a software soul and is the main body of the entire device. It can quickly read the displacement value of the optical ruler, and obtain the result immediately through the operation of the software module based on spatial geometry; and generate a graph on the screen, and the operator can compare the graph, so that the possible deviation of the measurement can be visually distinguished. Guangdong 3D contour measuring instrument is a high-precision optical Guangdong 3D contour measuring instrument. It is composed of a high-precision workbench structure.
View Details 》2022-09-09
Guangdong 3D Profiler is a non-contact optical instrument
Guangdong 3D Profiler is a non-contact optical instrument with dual LED light source, which basically does not damage the sample. Select different measurement modes according to the sample. Mainly used for mutual moving interference mode (PSI) for measuring smooth surface roughness, and vertical scanning interference mode (VSI) for height, width, radius of curvature, roughness measurement, etc.
View Details 》2022-09-09
Analysis of the scale and development prospect of China's machine vision market
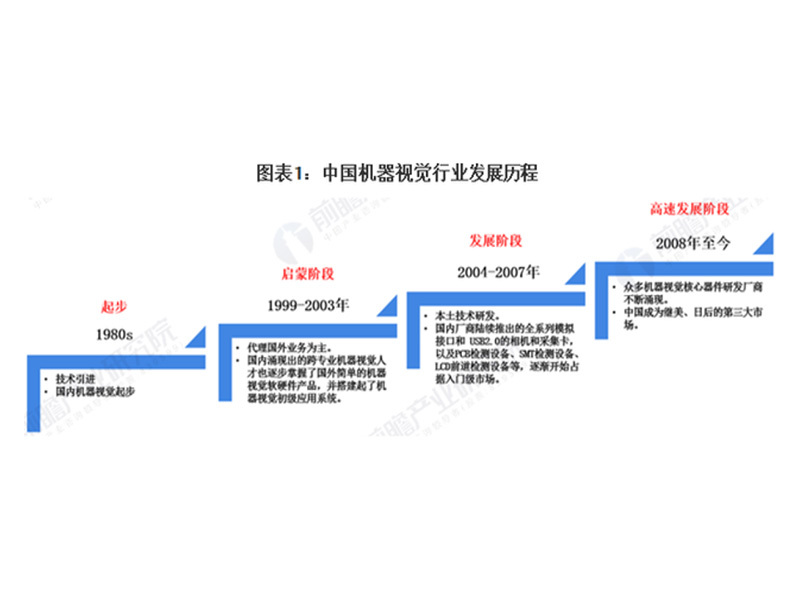
Domestic machine vision originated from the first batch of technology introductions in the 1980s. Since many electronics and semiconductor factories settled in Guangdong and Shanghai in 1998, machine vision production lines and advanced equipment have been introduced into my country, and the agents and system integrators of international machine vision manufacturers have been born. The development of machine vision in China has mainly gone through three stages. The first stage is the enlightenment stage from 1999-2003. At this stage, Chinese enterprises mainly serve customers through agency business, and guide customers to understand and recognize machine vision in the process of service, thereby opening the historical process of machine vision in China. The second stage is the development stage from 2004 to 2007. At this stage, local machine vision companies began to explore the research and development of machine vision software and hardware devices carried by more independent core technologies, and key breakthroughs were made in many application fields. The third stage is the high-speed development stage after 2008. At this stage, many R&D manufacturers of machine vision core components continued to emerge, and a large number of real system-level engineers were continuously cultivated, which promoted the high-speed and high-quality development of the domestic machine vision industry.
View Details 》2022-09-09
what? Flash meter? Where is holy?
Flash tester, many people may be hearing this name for the first time. She has many names, including intelligent automatic flash tester, flash test imager, one-button image tester, quick tester, etc. Flash tester should be regarded as a nickname. "Flash" means fast, just like lightning, it is conceivable that it is a fast measuring instrument, mainly used for two-dimensional measurement, and can be widely used in mobile phones, automobiles, precision parts, machinery, electronics, molds, connections It can be said that "where there is measurement, there is a demand for flash testers". It is especially suitable for batch measurement of small-sized workpieces such as mobile phone accessories, gears, springs, screws, etc.
View Details 》2022-09-09
3D visual inspection, the era of 3D measurement is coming
With the development and progress of machine vision, 3D machine vision has ushered in a huge opportunity in the automation industry. According to Grand View Research, by 2027, the global 3D machine vision market is expected to reach US$3.46 billion, with a compound annual growth rate of about 14.7%. Quality assurance and inspection applications are expected to occupy the top spot in the 3D machine vision market by 2022.
View Details 》


